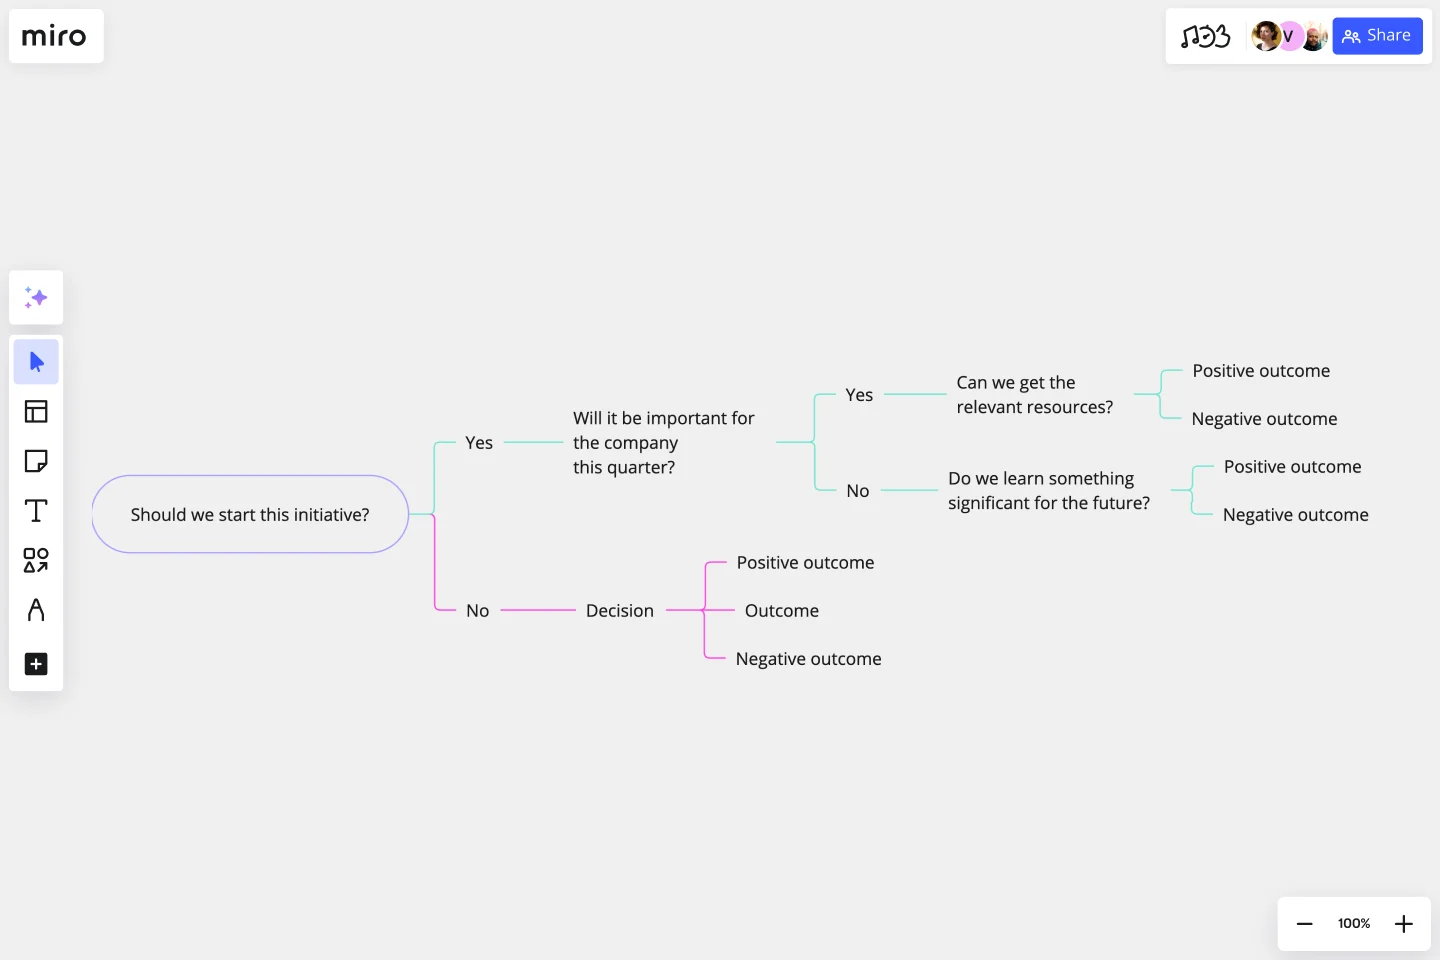
Decision Tree Template
Explore, plan and predict several possible outcomes to your decisions with Miro's decision tree template.
About the Decision Tree Template
The decision tree template (also known as a decision tree diagram template) is a ready-to-use flowchart template meant to help teams make decisions more effectively, namely by exploring all possible options and outcomes. The name “decision tree” refers to the way a tree is built, where your flowchart is “rooted” in one central topic, each “branch” represents a decision you could make about it, and each “leaf” represents a potential outcome of that decision.
But the branches don’t have to stop growing once you’ve identified its leaf. If an outcome leads to another action you could take, the decision tree template makes it easy to branch out from a leaf as many times as you need. In other words, the template is infinitely scalable, allowing you to explore as many angles as needed to solve your overarching problem as thoughtfully as possible.
Benefits of using a decision tree template
Using a decision tree template will save you time from having to build a flowchart from scratch, allowing you to dive straight into the problem-solving process. Plus, with Miro’s real-time collaboration features, you and your teammates can build a comprehensive decision tree together at the same time, within the same decision-tree maker — even if you aren’t all in the same room.
Filling in this decision tree template not only helps with filtering through multiple ways to solve a problem but also with identifying potential pitfalls and blockers in advance. Because of that, it’s especially beneficial for smaller teams with fewer resources. When it’s particularly challenging to get financial buy-in from senior stakeholders, building a decision tree helps you and your team make major commitments with confidence by carefully weighing all your options.
Enterprises and larger companies stand to benefit from the decision tree template too. Some key use cases include identifying new market opportunities and determining product viability. You might even use a decision tree to narrow down a list of solutions worth test-driving before presenting one to senior stakeholders.
The bottom line is that it’s for anyone tackling a problem with multiple possible solutions, wanting to identify the best approach based on their unique circumstances.
How to use Miro's decision tree template
Ready to fill in Miro’s decision tree template? Here are six steps to help you make the most of it:
Step 1: Define your question
First, open the decision tree template by scrolling to the top of this page and clicking on the “Use template” button. That’ll take you straight to the template in Miro, allowing you to start filling it in.
Once you’ve opened it, start by adding your central question or problem you want to solve to the oval on the lefthand side of the template, replacing the pre-filled text with your own. For example, if you’re trying to decide between different companies to partner with, write down “What company should we partner with?”
Step 2: Fill in the branches
Now, it’s time to branch out from your central theme. Edit the text along the first set of red and green connection lines by entering the initial decisions you could make. Sticking to our company partnership example from Step 1, replace the text that says “yes” along the green line with “Company A” and the text along the red line with “Company B.” Want to add more branches so you can consider more than two companies? Hover over the oval where you wrote your central theme to reveal the + button, then click on it. You’ll then see a new branch appear.
While the branches in this template grow horizontally toward the right, you can edit the template to have them grow vertically or even toward the left if you prefer.
Step 3: Fill in the leaves
You’ll notice that the initial decisions you added in Step 2 each branch out into more red and green lines. The text boxes at the end of these lines are the leaves; they’re your chance to identify any possible outcomes of your decisions. Not quite sure what to write here? Just think of them as the product of if-then statements.
For example, if you decide to partner with Company A, then you might need to think about whether you have the resources to do so. In this case, edit the text box that appears down the path of partnering with Company A and write, “Do we have the resources?” Similarly, partnering with Company B might require you to consider brand impact. In this case, edit one of the text boxes branching out of Company B and write, “How will it impact our brand?”
Step 4: Fill in more branches and leaves
Remember, the decision tree template is yours to customize. That means you can add as many branches and leaves as you need to identify the best possible decision. And since the outcomes we identified in Step 3 resulted in more follow-up questions, it’d make sense to answer them by branching out again.
For example, the follow-up question for choosing Company A is, “Do we have enough resources?” So fill in the text boxes along its red and green branches on the right to provide alternative answers. In this case, the template already comes with relevant pre-filled text to answer that question: “yes” and “no,” but feel free to edit the text or add more branches as needed.
As for their outcomes, remember to think of these as products of if-then statements. So if the answer is yes – meaning you have the resources – you could edit the text at the end of that branch to say, “Then we partner with Company A.” In this case, you’ve created a leaf that also happens to answer the original question. So feel free to delete any unnecessary branches and leaves to the right.
If you’re not sure whether you need to branch out more, take a few minutes to discuss possible follow-up questions and outcomes with your teammates.
Step 5: Final check
Before you conclude your decision tree and identify a final outcome, review the template to see that you’ve answered every possible question by making sure each branch has at least one leaf. In other words, you’re making sure you’ve worked through all “if-then” statements. When you’re done, align with your teammates on the best outcome of your decision tree.
Step 6: Double-check with stakeholders
When you’ve identified your key takeaway from the decision tree exercise, share it with your stakeholders to get them on board. Use the tree to talk through the pros and cons of your decision, identify valuable alternatives, and build out additional branches as needed based on any feedback you get.
The decision tree is only one example of a methodology for decision-making. if you'd prefer to diagram from scratch, get started with Miro's tree diagram maker and collaborate with your team.
What are the benefits of using Miro’s decision tree template?
Using Miro’s decision tree template comes with many unique benefits. With real-time collaboration features, you and your teammates can build your decision tree in Miro together at the same time, even if you aren’t in the same room. It’s also easy to add images, videos, or any other documents you need. You can even embed Google Documents, Spreadsheets, or Slides, saving you time from having to copy and paste any important notes. When you’re ready to share your completed Decision Tree Template, you’ll get to choose between multiple ways to do that — including exporting it as a PDF or sharing it using a link. You can also invite team members and stakeholders to share their thoughts by commenting directly on your Miro board.
Can I customize a decision tree template to suit my needs?
Yes. The decision tree template is meant to help you kickstart the problem-solving process by saving you time on creating a flowchart from scratch. But what you want to add to it, how much you expand on it, or even what you want it to look like is up to you. Using Miro’s decision tree template, you’ll have plenty of customization options like being able to adjust the thickness or color of your connection lines and shapes. You can even change your Miro board’s background color. That means you not only get to customize how detailed your decision tree is but also its entire look and feel. This is especially helpful if you prefer to keep your decision trees in line with brand colors and styles.
Get started with this template right now.
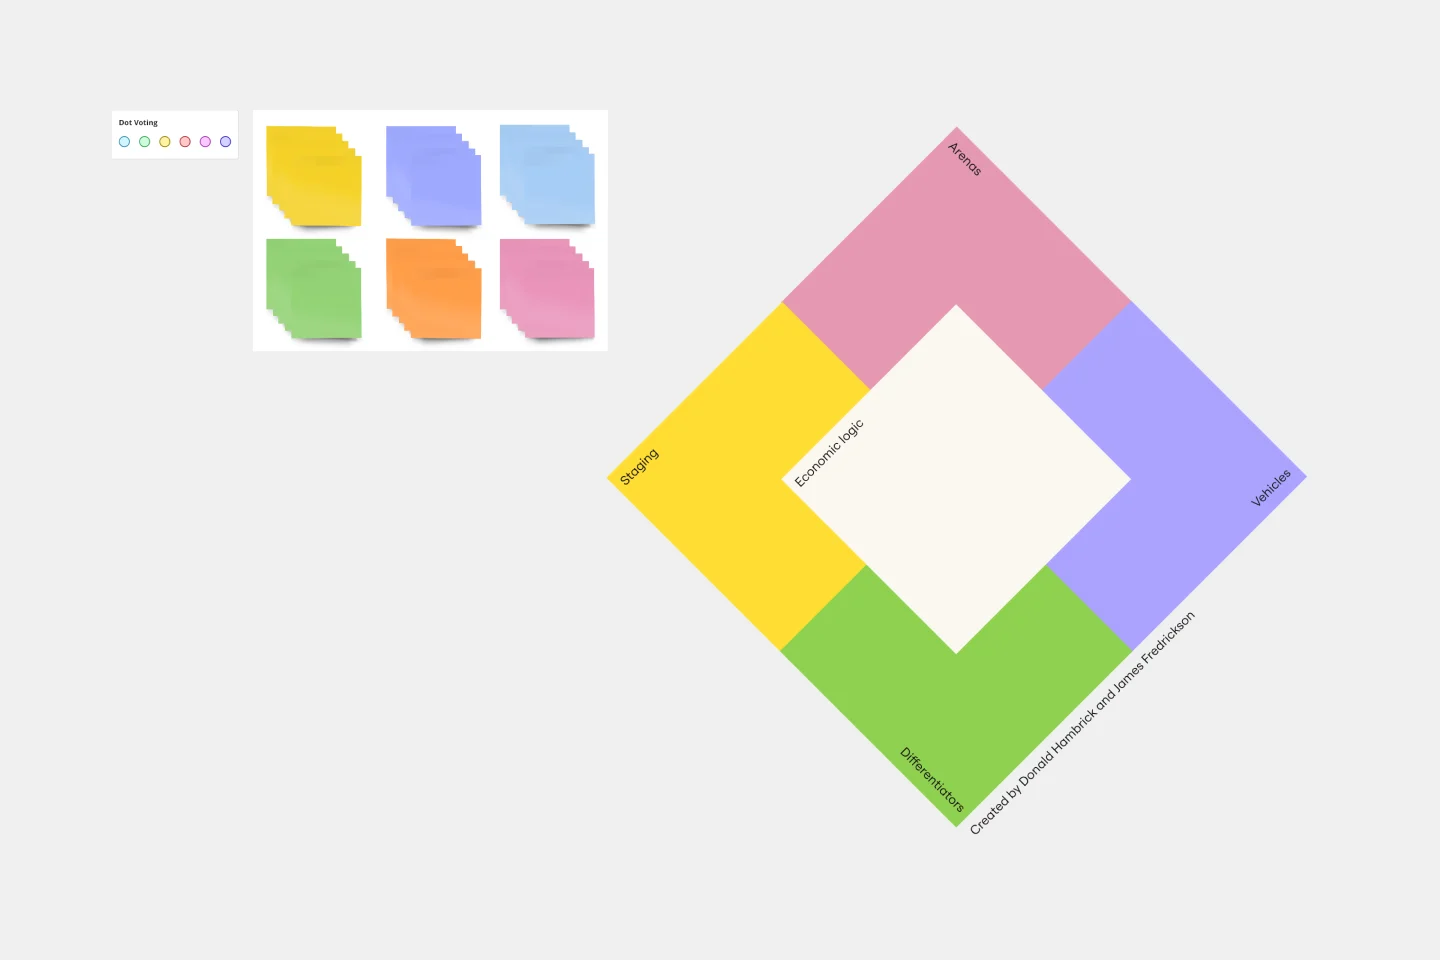
Strategy Diamond Template
Works best for:
Leadership, Operations, Strategic Planning
To achieve key objectives, every business assembles a series of strategies. But what elements should you consider when building a strategy? A strategy diamond is a collection of elements forming a coherent business strategy. These elements include: Arenas, Differentiators, Vehicles, Staging, and Economic Logic. Most strategic plans focus on just one or two of these elements, creating gaps that might cause problems for your business later on. A strategy diamond can help you stay focused and ensure you’re fulfilling all of your business’s needs rather than one or two.
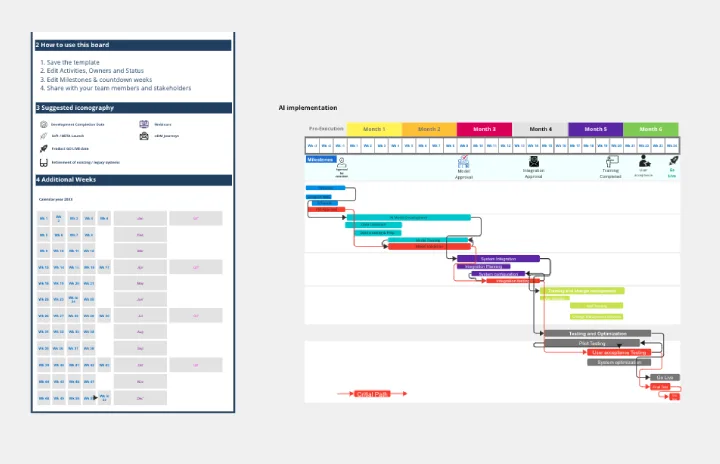
Gantt Chart for Project Scheduling
Works best for:
Planning, Strategy
Gantt Chart for Project Scheduling helps you plan and visualize project timelines. It enables you to manage tasks, deadlines, and dependencies, ensuring efficient project execution. Ideal for project managers looking to streamline their scheduling process.
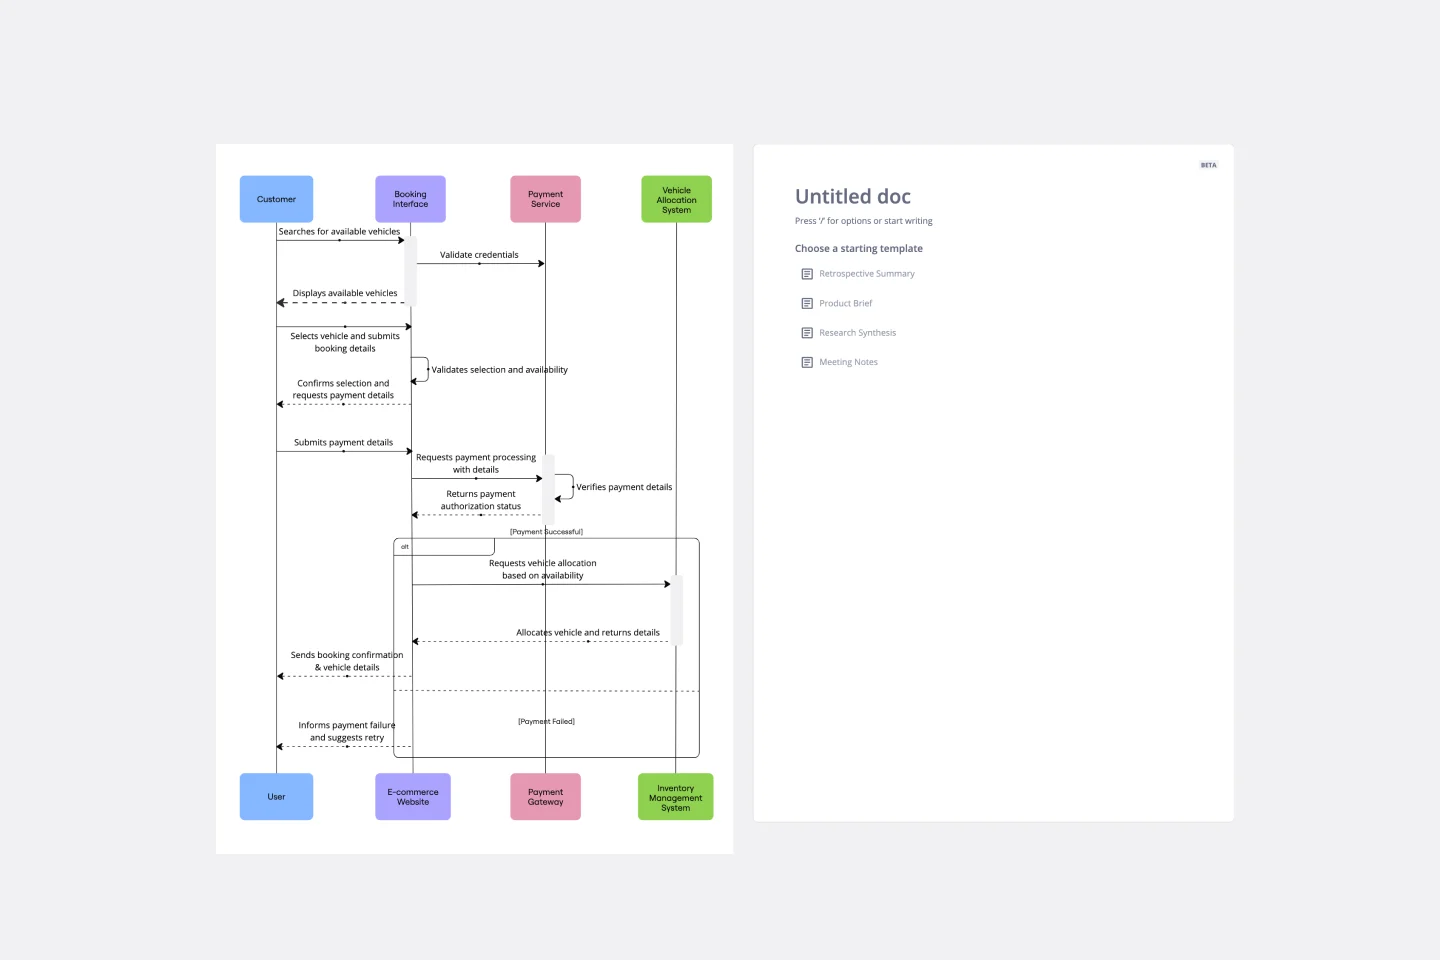
UML Sequence Rental Booking System Template
Works best for:
UML
The UML Sequence Rental Booking System Template streamlines the process of documenting and visualizing the interactions within a car rental booking system. This template maps out the communication flow between the customer, user interface, payment service, and vehicle allocation system, ensuring a smooth and efficient workflow. By providing a clear visual representation of these interactions, the template helps in improving understanding among team members and stakeholders, promoting efficient design and collaboration.
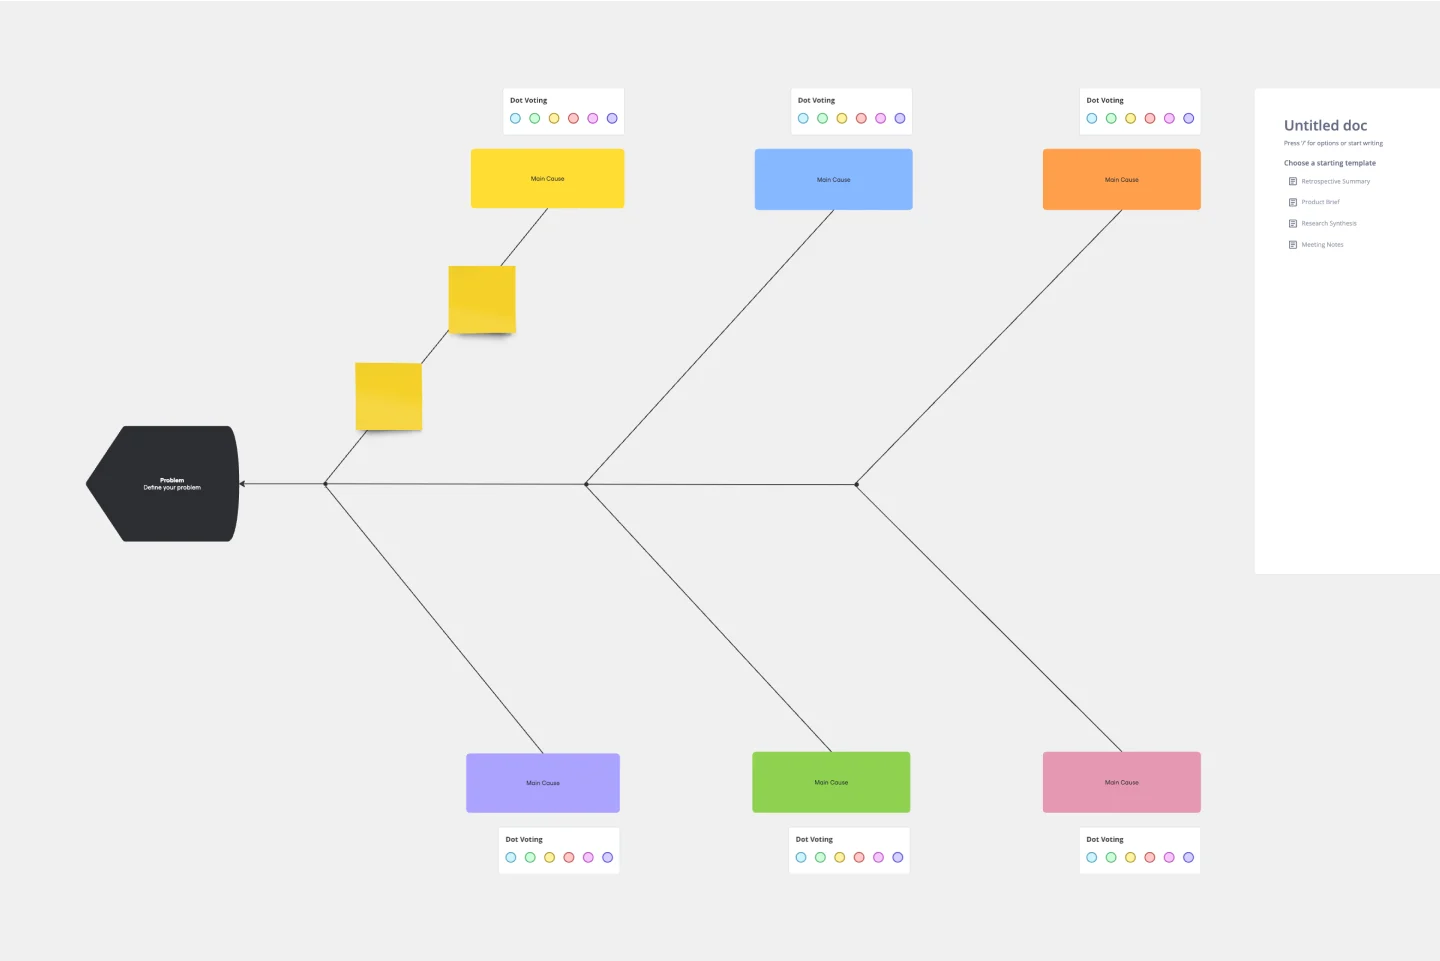
Fishbone Diagram Template
Works best for:
Operations, Diagrams, Workflows
What is the best way to solve any problem your team faces? Go straight to the root. That means identifying the root causes of the problem, and fishbone diagrams are designed to help you do it best. Also known as the Ishikawa Diagram (named after Japanese quality control expert Kaoru Ishikawa), fishbone diagrams allow teams to visualize all possible causes of a problem, to explore and understand how they fit together holistically. Teams can also use fishbone diagrams as a starting point for thinking about what the root cause of a future problem might be.
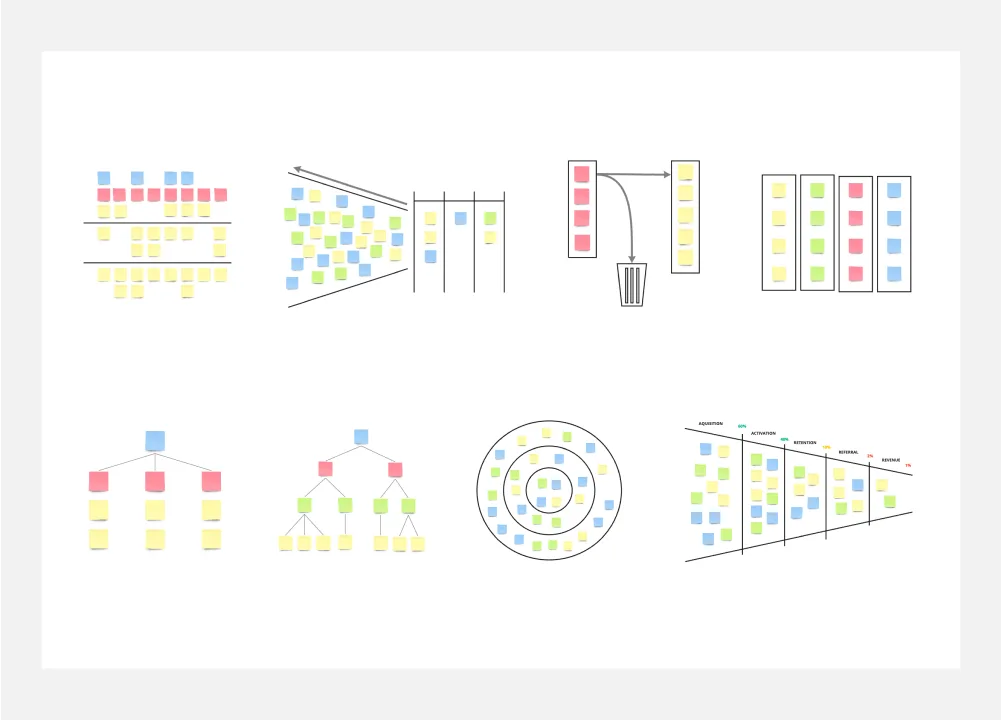
8 Different Ways to Organize Your Backlog
Works best for:
Agile
Explore 8 different techniques for managing and prioritizing work effectively with this template. From prioritization matrices to story mapping, it offers a comprehensive overview of backlog management strategies. By understanding the strengths and limitations of each approach, teams can tailor their backlog organization to optimize workflow, empowering teams to stay organized and focused on delivering value.
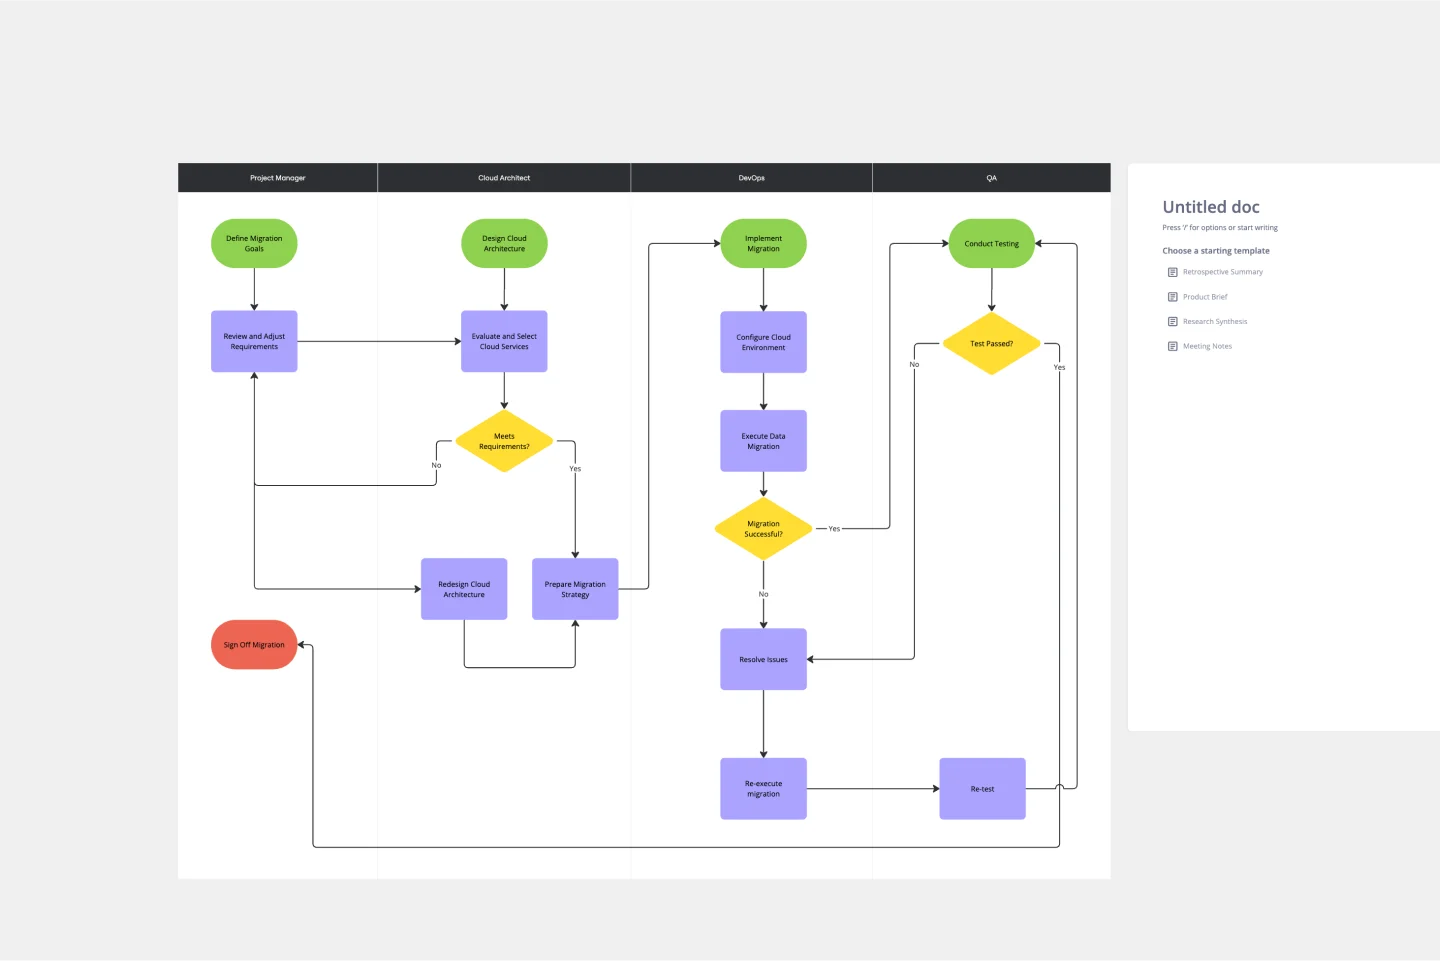
On-Premise to Cloud Migration Process Flowchart Template
Works best for:
Flowcharts
The On-Premise to Cloud Migration Process Flowchart Template is a strategic tool designed to streamline the transition from traditional on-premise systems to more flexible, scalable cloud-based solutions. This template acts as a visual roadmap, guiding teams through each phase of the migration process with clarity and precision. By breaking down the migration into manageable steps, it ensures a comprehensive approach, minimizing risks and aligning with best practices for cloud adoption.